Friday, April 27, 2012

Oh So Delicious .....Eclair Cake!


Five ingredients. That's all. This Eclair Cake is so lovely, and so so good. It's really light and heavenly.  I made it for Easter a few weeks ago, took it to my sister-in-law's house and LITERALLY every man, woman and child loved this dessert. The men got huge plate fulls of it. The women loved it. The toddlers loved it. The older kids loved it. The Grandma's and Grandpa's loved it. Do you get the point? It is sooooooo delicious. I got asked for the recipe by everybody there, and was able to tell them off memory because it is truly that easy. If you want something that is so easy and that everybody in your family will love,
 MAKE THIS!


Here's what you need:

Well, and milk to make the pudding. Shoot. Do I need to add a picture of milk? If you want to see a picture with milk in it, look at the picture above. The glass of milk by this Oh So Delicious! ECLAIR CAKE. Yes it is good. Ok.... Here's the recipe:

1 box graham crackers
2 (3 1/4-ounce) boxes French vanilla instant pudding
3 1/2 cups milk
1 (8-ounce) container Cool Whip, thawed
1 can chocolate frosting (I recommend Milk Chocolate)

(I have since made this for just my husband, and I just halved the recipe and made in a smaller pan.)


Spray the bottom of a 9x13 pan with cooking spray. Line the bottom of the pan with whole graham crackers. (You may have to break some to completely cover) In bowl of an electric mixer, mix pudding with milk; beat at medium speed for 2 minutes. Fold in whipped topping. Pour half the pudding mixture over graham crackers. Place another layer of whole graham crackers on top of pudding layer. Pour over remaining half of pudding mixture and cover with another layer of graham crackers.

Heat the container of prepared frosting, uncovered in the microwave for 1 minute. Pour over the top of the cake. Refrigerate for at least 12 hours before serving.

Once you pull out of the fridge the next day, the graham crackers will be softened and that is what will form your crust. And here is what it will come out like...... and you will love it. xoxoxoxo


I got the original idea for this recipe from Plain Chicken

And linked up at these way cool parties!

Tuesday, April 24, 2012

A Little Lacy Flower Pot

Orchids. They are my favorite flower. They are low maintenance and last forever, a lot longer than having fresh cuts in a vase. I love them so. I also love lace. I also love love love black and white color schemes. Hence came my idea for this "Little Lacy Flower Pot" It was so incredibly easy. My kind of DIY! Easy and inexpensive with an amazing end result. I am a little embarrassed to do a tutorial on this, it was that easy.

Here is what you do:
 Buy a Terracotta Pot. Paint it. Love it. I got one with a plate underneath. I painted that too. 


Place strip of lace around your painted pot, and attach with double sided tape. Trim off excess, and straighten the lace.

Plant your flower of choice in the pot. I cheated and just set the orchid in it's existing pot down in there. 

Here is the finished product. In front of my wallpaper that came today. That I literally taped to the wall I was so excited. I have been staring at it all day. My lovely mama and I are going to put up the wallpaper tomorrow.

Back to the pot. Do it!! Flowers make rooms happy. They make us happy. I am so grateful that God made them for us to enjoy. 

Thank you Lord for my pink orchids in my little lacy black and white flower pot.

I linked up this post with these awesome blog parties:
Uncommon Designs Online 
Sew Much Ado 
House of Hepworths 
52 Mantles 
Tatertots and Jello 
It's Overflowing 
Women Living Well
Thrifty Decor Chick 
Centsational Girl 

Monday, April 16, 2012

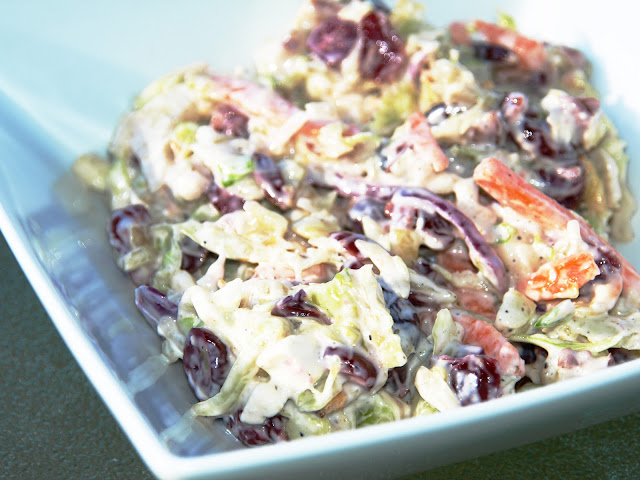
Dr Pepper BBQ Pork w/ Blue Cheese Coleslaw


Enough said. Actually, I haven't said anything yet... but really.... do I have to? If these are not the best pulled pork sandwiches you have ever had, I will give you $500.00. I actually won't. Already done too many giveaways for the size of my tiny blog :) Anyways, make these, eat them. The bbq pork is made in the slow cooker and is so so easy, the Dr Pepper (Don't be freaked out)  acts as a tenderizer and gives such nice flavor, oh and the coleslaw.... How do I put this?? IT IS THE BEST COLESLAW YOU HAVE EVER HAD. EVER. My husband, who does not normally like coleslaw, will eat this by the bowl full. It is seriously that good. I started experimenting with blue cheese coleslaw recipes when we moved to Oregon. You see I used to eat this little cafe/coffee shop called Rembrandts in Eagle, ID. It's such a cute place in an old church building. I would go there for just the coleslaw. Well we have moved back to Idaho, sadly for Rembrandts, I will not be going back there for the coleslaw, I like my version better. My version has bacon, and it is wonderful.

Isn't she pretty?


Here is what you will need for the coleslaw:

1 bag coleslaw mix
1/3 cup dried cranberries (don't leave out)
1/3 cup blue cheese crumbles
3/4 cup ranch
1/3 cup mayonnaise 
9 pieces an undisclosed amount of bacon, crumbled

1. Cook your bacon. I bake mine in the oven. Here is a link. Perfect bacon every time.
2. Combine all other ingredients in bowl.
3. Crumble bacon. Add it, however much your heart desires. <3
4. Season with salt and pepper.

I like to make this a day ahead and put in refrigerator. It is the best coleslaw in the world. All ingredients are to taste. If you want it a little more blue-cheesy add more, etc. P.S. I hate blue cheese salad dressing. Do not add that. That stuff is gross. P.S.S. I am not a huge blue cheese lover. In this however, it is to die for!! I dare you to try this even if you do not like blue cheese and tell me you don't like it. It is soooooo good.

For the pulled pork:
 

3 pound pork roast (Or Beef or Chicken)  (NOT FROZEN)
2 T olive oil
Montreal Steak Seasoning
3-4  Dr. Pepper or Coke  
1 T Worcestershire
1 T   Liquid Smoke
1/2 Onion (minced/finely chopped)
1/2 Bell Pepper (minced/finely chopped)
1 1/2 - 2 C Sweet Baby Rays BBQ Sauce

1. Season Pork Roast generously with Montreal Steak Seasoning. Pat the seasoning into the roast with your fingers.
2. Heat Olive Oil in skillet.
3. Brown Roast on both sides, remove from skillet.
4. Poke the Pork Roast with fork a few times and transfer it to a large crock pot. 
5. Pour the soda over the top of your meat. Add onion, bell pepper, liquid smoke, and Worcestershire.  Cover and cook on low for 7 hours, or until the meat shreds nicely with a fork.
6. Remove the roast from the pan, shred it all up. Drain the soda juices from the crockpot. Place the shredded roast back in the crockpot and add bbq sauce, cook for an additional hour. 


I serve mine on toasted buns. Put a little butter on your buns (that sounds funny) and put under broiler for 2-3 minutes. My husband says (this way, with the buttered buns) "brings it to the next level, and I give it 10 out of 5 stars :)
Printable Recipe


Enjoy!


My models..... Do their little turn on the cat walk....


Linked up at:
Addicted to Recipes
Cooking with Karyn 

Click here to see some other awesome blog parties I link up with!

Saturday, April 14, 2012

Painted Thrift Store & Dollar Store Vases!

I am so excited to share this tutorial with you! I got the original idea here.  It requires very few supplies and you will be so happy with the results! You basically just add paint and water to a vase and rotate/swirl to coat. By painting the inside of the vases the outside remains glassy and beautiful!


Here is what you need to do this project:
  • Vases
  • Paint
  • Water
  • Foam paintbrush
  • Coffee Filters
  • Sponge
 The paint samples I purchased were both Glidden... "Sweet Baby Girl" and "Almost Aqua". I then decided to use some leftover gray and white paint I already had.


Make sure your vases are clean, and then put about 1 tablespoon of paint in the bottom of the vase, then add a few drops of water. Just a tiny amount, otherwise the paint will run!

Coat evenly by moving bottle. Twirl the paint around by turning the vase, use coffee filters to cover the top with so that you don't get paint everywhere. Its ok if you get paint on the outside of the vase! Just use a sponge to wipe off as you go. Next place the vase face down on the coffee filters (they really absorb a lot) A lot of paint will drip out the bottom. Leave for about 2 minutes face down, and then flip back over right side up.Use a foam paintbrush for touch ups. Let dry completely. I did two coats! You can't add water to these vases after you paint them. (The orchid I used is silk) If you want something you can add real flowers to, check out my lovely friends tutorial here. She just simply painted the outside of her vases to look like milk glass!


This will be their home on this shelf in my kitchen, when we are finished painting our counter-tops, like we did here in our last house. I think I will add another shelf of them and do some more.


For now, they are here on this table in my living room. What do you think?


I linked up this post with these lovely blog parties:
Tater Tots and Jello 
It's Overflowing

Monday, April 9, 2012

No Sew Pillow Tutorial!

 Let me explain something to you.... THIS IS THE EASIEST DIY PROJECT YOU COULD EVER WORK ON. Seriously. So easy, so inexpensive, and you will be so pleased with the results. There is no sewing required, no real measuring either. You just simply cut, fold, tie, and tuck. Let's get started!


First, you want to select your fabric. I got mine at Walmart for $1.50 per yard. A pillow for around $1.50? Yes please. I chose a light weight almost sheer fabric. Which worked amazingly! I had originally got it to make a dress out of, but thought I had would give the tutorial I found here, a try!  Now that I know it's awesome I will go buy some different coordinating fabrics that actually match with my living room, and do some more!


Step 1)  Cut your fabric and start the wrapping process! Your "measurements" are as follows: Your fabric should be 2 and 1/2 times as tall as your pillow and 3 times as wide. If you can wrap a present you can make this pillow. I am not even kidding, do it! You want to put your pillow in the middle after you cut the fabric and then fold over the pillow like below! (just like when you first start wrapping a present)

  Step 2) Fold the edges (like a present)


 Step 3)  Fold the edges again over the top of your previous folds Til the ends get a little more pointy. Like this.


  Step 4) Bring the edges up over the sides like this.


 Step 5) Tie a knot. Just a simple knot.


Step 6) Tuck the tails of the knot underneath the knot. Sorry best way I can explain it. Til it looks like this... Tah dah!


You can also turn your pillow around if you don't want to see the knot, rosette like thing. P.S. That's what I did with the black and white striped pillow! 


Give it a try and send me a picture of the results. I promise you won't regret it! 

Let me know if you have any questions! I love to hear from you!

Linked up this post with
Thrifty Decor Chick 
Click here to see some other awesome blog parties I link up with!

Friday, April 6, 2012

Target Gift Card Giveaway!

Thank you everybody for participating. Rachel Habets is the winner! This giveaway is now closed!

I heart Target. I really really do. I mean.... who wouldn't?  If you don't love it, get off my page. KIDDING KIDDING. Seriously though....how would you like a $25.00 gift card to Target? Ok, the rules are at the bottom of this post.  In the mean time here are my picks of what I would choose from Target for $25.00 or less!
 
A ruffly pillow! I LOVE ruffles. I have a few ruffly pillows and they make me happy. Ruffles = happy.
Click here to see this teal ruffly pillow! ($24.99)
A sunburst mirror! Are they a fad? Yes. Should every home have one? Yes. Click here to see a gorgeous bronze sunburst mirror in a living room.
Click here to see the bronze sunburst mirror pictured above. ($24.19)


A maxi dress! They are so great on so many body types. Especially this empire waist style. For spring and summer, they are awesome! Do you agree?
 To see this kimono sleeve maxi dress click here ($24.99)

 
A floppy hat! I don't know if you can tell, (wink wink, look at my welcome picture.) But I love floppy hats, they remind me of my honeymoon, and shopping at the Saturday Market in downtown Boise.
Click here to see this cute little floppy hat. ($14.99 available in stores)


A jewelry tree! I don't have one. I want one for my desk. Just to put a few necklaces on. Isn't this one cute? Click here to see this adorable little jewelry organizer. ($20.99)


Ok, so at 100 facebook "likes" we will do the drawing. Here are the rules!! Follow closely.You must do TWO things in order to be qualified. 

(if you do not have a facebook then you must be a blog member)

2) Leave a one word comment on the Live Gorgeously Facebook page, or here on the blog letting me know what you want to see the most of on here. Here are your choices: 

Decor 
DIY
Fashion
Beauty
Recipes

Linking up at   One Chatty Chic

Wednesday, April 4, 2012

Painted "Granite" Countertops Tutorial


First of all, welcome!! I am so excited to start this blog. I hope to be an inspiration and encouragement to all of my followers! (which at this point, would be zero four!.) :) By the end of today, I told my husband I would like to have 150 followers. Kidding Kidding! Sort of.... I am a wee bit of an over achiever... Anyway, my hope for this blog is that I will be able to teach people that you can look great and have a beautiful home without breaking the bank!

Enter our countertop transformation! We painted them to look like granite, and were THRILLED with how they came out! They are extremely durable, and beautiful, sparkly, shiny, reflective, and the best part... cheap! Total cost $150.00! I got my original idea here.

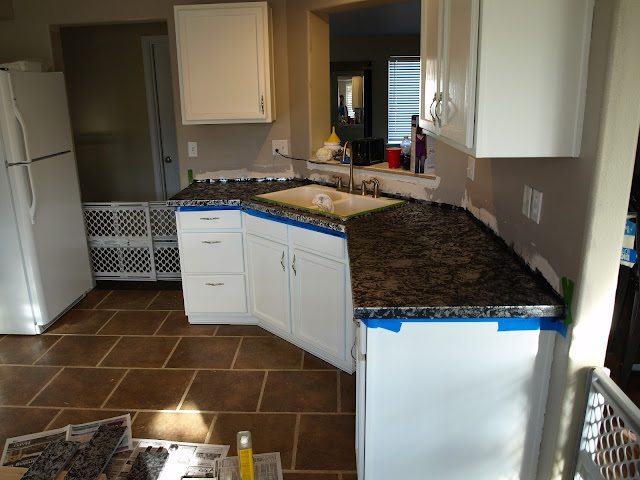
Here below is the "before"
Let me make a disclaimer and say that I wasn't fully planning on starting a blog and mainly just took a few pictures of the process for our family and close friends to see. However, we just moved back to Idaho and will be doing this technique in our new house (yes we love it that much) and I promise to take better pictures this time! Let's get started with what we have....


 First we painted our Cabinets. (more to come on that later) added hardware, and then primed the countertops with a gray primer. My hubby bought some MDF boards to use as the backsplash and we primed those at the same time.

This is the primer we used. The greatest primer in the world. That I use on everything. No sanding required. http://www.homedepot.com/buy/paint/primers/cover-stain/1-gallon-white-primer-sealer-98105.html


 Here is where I don't have a lot of pictures to show the process.  :( What you want to do after your primer dries is paint your base color coat. (Which in our case was black) After that we used two accent colors, (gold and silver) which we sponge painted on. When you first sponge the silver and the gold over it will look so metallicy. (like above) It is very important that you then sponge back over that with the black paint (base paint), until you get the desired look you want to achieve!


Now you want to go over the sponge look with more of your base color until the (sponging) is much more subdued. Until you get this look:


Once DRY (this might not make sense) but trust me, you can put your glitter on. We used a black glitter for texture and a little silver glitter for sparkle. I love sparkle. If you put glitter on when the paint is wet, some of the glitter will "stand up" and then rise to the surface of the clear coat you put on top. Sprinkle glitter (just a little) once the paint is dry. Then you are ready for THE MOST IMPORTANT STEP.  Please cover your cabinets in newspaper before doing this!


This stuff will blow your mind. Knock your socks off. It is AMAZING. And the key/secret ingredient, and what sets this "system" apart from using one of the granite paint kits you can buy. I read a lot of reviews on those paint kits and a common theme was that through time peoples countertops would get soggy. Because of such a thin clear coat on top. Not this stuff. When it says it is equal to 50 coats of varnish it really is. It is self leveling and awesome. It will put a sheet of glass that is hard as a rock over the top of your countertops and make them as hard as granite! and as purdy.  Follow the instructions on the box (or have your husband follow the instructions) It is imperative that you let the Envirotek cure for 72 hours. (That was the hardest part.) Then you are ready to enjoy your kitchen. Once cured it should look like this! 


****UPDATE**** Please see the Q&A Post on this tutorial here: Painted Countertops Q&A  It will help answer a lot of the questions you may have!


Linked up with Thrifty Decor Chick 


Click here to see some other awesome blog parties I link up with!